Shenanigans with systemd
Service management with an unfriendly Python script.
A modern operating system is supported by hundreds of processes that handle communication between the user and the computer hardware. Most of the time, we deal with interactive processes (i.e., applications), but behind the curtain are a myriad of services; processes that run in the background and support various low-level functions of the operating system, such as logging and memory management.
To better understand how services are managed in Linux, I decided to make my own service and manage it through systemd, the service manager used by CentOS 8. It’s definitely not the most exciting topic in the world, so to make things fun, I decided to develop a Python script that monitors the keyboard for certain words (and delivers unwanted feedback) and make a service out of it.

Table of Contents
Understanding systemd
Systemd manages things called units that represent different kinds of system resources. Each type of resource is handled by a specific type of unit. Here are three examples:
sshd.service, the service unit which manages the OpenSSH service,boot.mount, the mount unit that specifies which file system gets mounted to the/bootdirectory,dbus.socket, the socket unit that activates the D-Bus message bus (a service that handles communication between applications) to process intercepted messages.
Units can also describe devices, timers, and more abstract things, like targets (groups of units) and slices (reservations of CPU/RAM/storage/bandwidth for groups of processes). For now, just appreciate that the notion of a unit is a very broad one.
# systemctl list-unit-files on my system yields a total of 421 units, with roughly a third of these being service units.
Although systemd is massively multi-purpose and capable of handling all kinds of system tasks (with perhaps the most important being system initialization), this writeup will focus on using systemd for service management.
Service management
Most of the time, a service will sit in the background and keep out of trouble. When issues do arise, we need a way to interact with the service by querying its status (e.g., “are you still alive?") or by stopping and (re)starting the service.
These are achieved with # systemctl <verb> <name>.service, using the verb
start, to start a systemd service,stop, to ask the service to stop (as opposed to killing it),status, to get general information about the service,restart, to stop and then start the service.
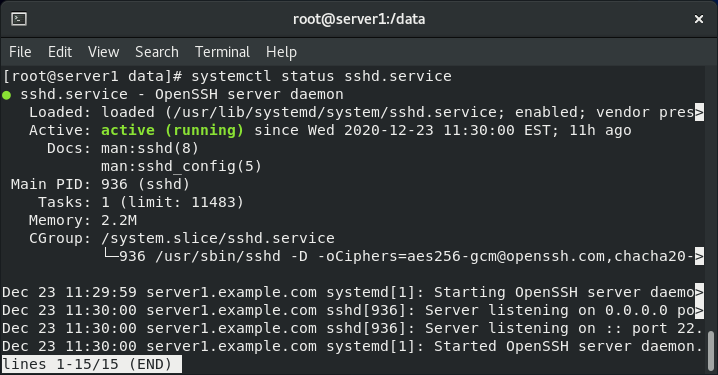
We can check on the status of the OpenSSH service, for example, by running # systemctl status sshd.service. The output (Fig. 2) gives us a lot of useful information, including some manpage references (Docs) and whether the service is
- loaded (systemd has read the service’s configuration file) versus not-found,
- enabled (the service will run after booting the system) versus disabled,
- active (running) versus active (exited) or inactive (dead).

At the end of this output, you can see the last few lines of OpenSSH’s logging output, which can often be helpful for diagnosing problems. The full session log can be viewed with # journalctl -u sshd.service, which queries systemd’s journal, a single binary file that collects all messages from the operating system and userland applications.
# systemctl enable <name>.service.
Unit files
If you read the ‘loaded’ line of the above output, you will find a reference to a file located in /usr/lib/systemd/system/sshd.service. This unit file defines the OpenSSH service, including how and when to start it, whether to restart it after failure, and important environment variables for configuration. Essentially, unit files are the means by which systemd understands system resources.
Let’s take a look.
/usr/lib/systemd/system/sshd.service
[Unit]
Description=OpenSSH server daemon
Documentation=man:sshd(8) man:sshd_config(5)
After=network.target sshd-keygen.target
Wants=sshd-keygen.target

[Service]
Type=notify
EnvironmentFile=-/etc/crypto-policies/back-ends/opensshserver.config
EnvironmentFile=-/etc/sysconfig/sshd
ExecStart=/usr/sbin/sshd -D $OPTIONS $CRYPTOPOLICY
ExecReload=/bin/kill -HUP $MAINPID
KillMode=process
Restart=on-failure
RestartSec=42s

[Install]
WantedBy=multi-user.target
A service unit file consists of three sections, denoted using square brackets. The [Unit] section above contains four directives that together describe the unit and define its dependencies. In this section, the most important directives are
After, used to direct systemd to start the configured service after the listed units become fully functional, andWants, to list units that should be started together with the configured service.
In our case, After=network.target sshd-keygen.target makes sure that OpenSSH is started after two (target unit) resources become available: (a) the
network management stack, allowing applications to access the network, and (b) OpenSSH’s keygen server, which is used by OpenSSH to generate keys for public key authentication.
After=network.target doesn’t guarantee that your service will start after your network interfaces are online! The purpose of this directive value is to allow your network-dependent service to terminate properly when the system is shutdown. To ensure a service starts after the network comes online, use After=network-online.target.
The [Service] section describes how to (re)start and stop the service. Different Type directive values determine how the process should start, with Type=notify telling the service to send a signal to systemd when it is active. The EnvironmentFile directives are used to load variables (OPTIONS, CRYPTOPOLICY, MAINPID) contained in the listed files, which are used by ExecStart and ExecReload to configure the execution and termination of the service. If the service ends unexpectedly, Restart=on-failure tells systemd to restart the service, in this case after 42 seconds.
EnvironmentFile directives are missing, the show will go on.
Lastly, the [Install] section holds information about how to install the service, so that it can be started at boot. The directives in this section are processed when evoked by systemctl enable or systemctl disable. It is common to find WantedBy=multi-user.target here; this specifies that systemd should start the service only when the system has reached a certain state, defined by the multi-user.target unit. If the system cannot reach this state, the service will not automatically start, even if it has been enabled.
System state
It’s worth expanding on what we mean by state. After powering on a CentOS Linux system and loading the kernel, systemd is the first process to start (
PID 1). Systemd will then proceed to activate services and other units until the system has reached some requested (default) state, represented by a systemd target. For example, if systemd achieves the multi-user.target state, multiple users can log into the system and access the network, but they are unable to start a graphical shell and are thus restricted to a text-based shell. Booting into the rescue.target state is usually reserved for emergency situations where the system cannot start normally. In this case, systemd will only start the bare minimum set of system resources, avoiding the activation of network interfaces and other nonessential peripheral devices. This allows the root user to try and reverse any changes that harmed the regular initialization process.
The table below lists the available systemd targets in CentOS, together with their associated outcomes and
runlevels (i.e., the equivalent of state in other init systems). By default, CentOS will attempt to achieve either the multi-user.target state or the graphical.target state, with the latter for GUI-based installations.
| Runlevel | Target | Outcome |
|---|---|---|
| 0 | poweroff.target | 🔌 System shutdown |
| 1 | rescue.target | 🚑 Single-user “safe mode” shell |
| 3 | multi-user.target | ⌨️ Non-graphical multi-user shell |
| 5 | graphical.target | 👨💻 Graphical multi-user shell |
| 6 | reboot.target | ⚡ System reboot |
These targets are special in that they can be used to switch the current state of the computer using the # systemctl isolate <name>.target command. For instance, you can restart your computer with # systemctl isolate reboot.target. This is made possible by the inclusion of the AllowIsolate=yes directive in each of these unit files.
At this point we know enough to start playing around with our own services. Time to get your hands dirty!
Creating services
We will deal with two custom services: (a) the Hello service, which will serve as a kind of warmup to reinforce some important concepts (while introducing some new ones), and (b) the Judgy service, the ultimate subject of this writeup.
Before we get into things, a quick note about where systemd expects unit files:
/usr/lib/systemd/system, for default unit files that come with RPM packages,/etc/systemd/system, for custom unit files (e.g., made usingsystemctl edit),/run/systemd/system, for automatically generated unit files.
That means our unit files are going in /etc/systemd/system. You can create the Hello unit file the old-fashioned way (e.g., via vim) or by running # systemctl edit --force --full <name>.service, which will bring up a text editor for you to work with.
/run will take precedence over others. Next in line are unit files in /etc, with units in /usr/lib being of lowest priority.
A quick warmup
Let’s introduce the Hello service unit file. As you can see, there’s not a lot to it.
/etc/systemd/system/hello.service
[Unit]
Description=Hello service

[Service]
ExecStart=/usr/bin/bash /data/hello.sh 10 meepmeep
Once activated, the service will execute a script called hello.sh, shown below. When executed, it first lists any command line arguments, and if the first argument ARG1 is a positive integer, sleeps for ARG1 seconds. Simple enough.
/data/hello.sh
HMS=$(date +"%H:%M:%S")
printf "\n[%s] HELLO service came online.\n" ${HMS}

# print out command line arguments
if [ "$#" -ge 1 ]; then
    i=1;
    printf "Supplied arguments:\n"
    for ARG in "$@"; do
        printf "\targ%d: %s\n" $i $ARG
        i=$((i + 1));
    done
fi

# sleep for ARG1 seconds if ARG1 is a positive integer
if [ -n "$1" ] && [ "$1" eq "$1" ] 2>/dev/null; then
    sleep $1
fi

HMS=$(date +"%H:%M:%S")
printf "[%s] HELLO service is done.\n\n" ${HMS}
Here’s the output of the script if we run it normally:
# ./hello.sh 10 meepmeep
[13:23:56] HELLO service is online.
Supplied arguments:
    arg1: 10
    arg2: meepmeep
[13:24:06] HELLO service is done.
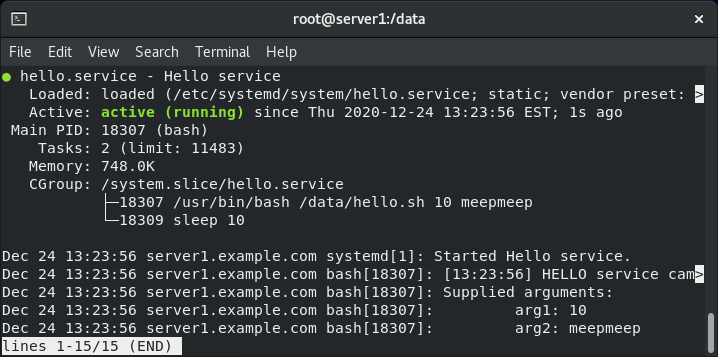
If we start the service with # systemctl start hello.service and quickly check its status, we can see the output of the script within the logging output.

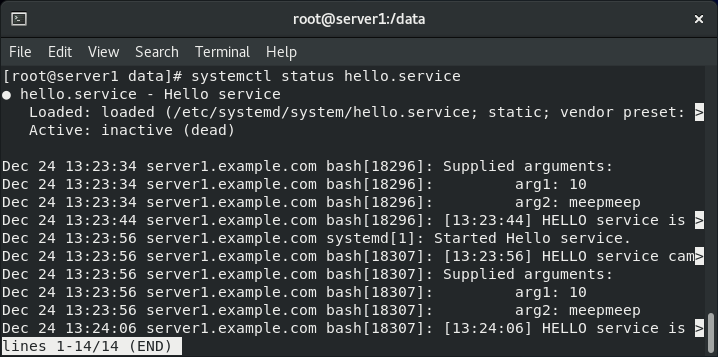
After ten seconds of sleep, the script is done and the service becomes inactive.

That was a pretty straightforward example, so let’s build on it to show something useful.
Unit file overrides
We might not always want to start our service with the same directives and parameters. Indeed, there might be times where we want to override some of them while keeping others. This is where drop-in units come in handy.
Here’s the situation: we like our Hello service, but we want to make two changes:
- (a) we want to supply input arguments to
hello.shfrom a file, - (b) once the service becomes inactive, it should restart after sixteen seconds.
To achieve the first goal, we will make hello.config, a configuration file from which systemd will extract the script’s input arguments, shown below.
/data/hello.config
DELAY=16
OTHERARG=testing.one.two.three
We will now create a drop-in unit that loads these variables with the EnvironmentFile directive (and uses them when overriding the previous ExecStart directive). The unit also injects two new directives that satisfy our second goal. You can use # systemctl edit hello.service to create the drop-in file, nested in a hello.service.d folder.
/etc/systemd/system/hello.service.d/override.conf
[Unit]
Description=Hello service

[Service]
EnvironmentFile=/data/hello.config
ExecStart=
ExecStart=/usr/bin/bash /data/hello.sh $DELAY $OTHERARG
Restart=always
RestartSec=16s
Pay attention to the empty ExecStart directive. This is done to eliminate the parent directive; without it, the complete unit file (base plus override) would in effect have two ExecStart directives, leading to an error.
systemctl daemon-reload.
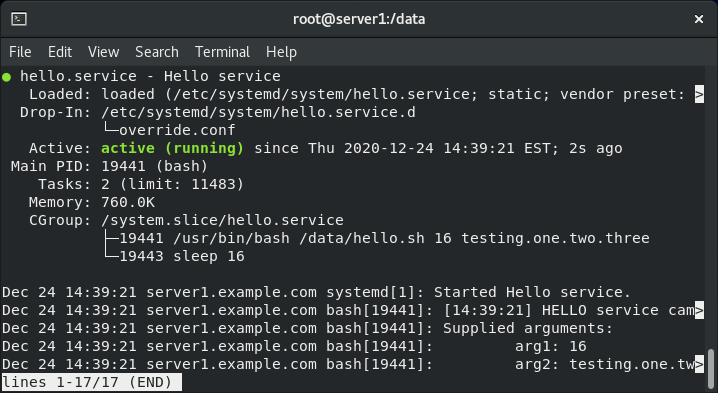
Now if we fire up our service, we will see that the script is now working with the new input arguments. Note the new Drop-In line, which lists the overriding unit file.

If we query the service after it has expired, we can see that the Active line contains activating (auto-restart). This indicates that the service is scheduled to be restarted, which is evidence that our new configuration has taken effect.

Getting judgy
We have made it to the final act. The goal here, as mentioned at the outset, is to run a Python script that monitors a specific user’s keypresses and delivers (juvenile) notifications to the user, depending on the content of the user input. The solution will, of course, be implemented as a systemd service.
Judgy’s source (shown below) makes use of two important resources:
-
keyboard, a lightweight event hook library written in Python, and -
notify-send, a program to send desktop notifications, provided by libnotify.
After registering process_key() as the keypress callback, the script will indefinitely sleep and process keypresses, buffering all typed alphabetical characters. If the user presses a non-alphabetical key, Judgy will test the buffer for objectionable content (defined in the *_words wordlists) with pass_judgement() before clearing the buffer. Should the user have typed any words contained in these wordlists, judgement will be rendered in the form of a graphical notification delivered to the user with send_notification(). Judgy will continue to process keypresses until the user enters the safe word (scram).
Some important points:
judgyneeds to be supplied with the username of the (logged-in) desktop user,notify-sendwill not work without the D-Bus address of the desktop user,keyboard(and thereforejudgy) needs to be run as root.
As for the service unit, we will opt for simplicity. Judgy is started using sudo and a Python interpreter (with btables being the username of the desktop user). You could add an [Install] section and start Judgy at boot, but that would likely get very irritating.
/etc/systemd/system/judgy.service
[Unit]
Description=Judgy service

[Service]
ExecStart=/usr/bin/sudo /usr/bin/python3 /data/judgy.py btables
Start the service via # systemctl start judgy.service and you’re in business. You can stop the service either through systemctl or by entering the safe word.
Summary
If you made it through the writeup, congratulations! By now, you likely have a decent grasp of the basics of service management, as well as an appreciation for systemd’s various capabilities. Although I am no sysadmin, the process of making this writeup has improved my understanding of how systemd operates under the hood, while at the same time making me realize how much more there is to this software monolith…